In a bad case of what the hell took me so long, I localized a WebObjects project for the first time today.
There are two possible approaches to localization in WebObjects – component and string. Component localization creates multiple instances for each supported language for each component. It is warranted if you need to drastically change the layout between languages.
In my case, all I need to do is change the text (mostly labels) as all of the other content is being pulled from a database and the layout remains the same regardless of language. So string localization is fine.
The process of string localization is not that difficult, and if you are using Project Wonder (as the following demonstrates) it is WonderFully (hem!) easy.
We need to start by making sure that Session extends ERXSession.
public class Session extends ERXSession {
    //Session code here
}
Next we need to add this code to the Session constructor:
public Session() {
    super();
    //New code
    NSArray array = new NSArray(new Object []
                               {"English",
                                "French"});
    ERXLocalizer.setAvailableLanguages(array);
    //End new code
}
ERXSession contains an instance of the ERXLocalizer class. The code above passes it an array that tells it what languages to expect and the order in which to expect them. (In this case English and French, by default the languages are English, German & Japanese).
Next we need to create the properties files that will hold our localization data: Open up your WebObjects project (I’m using Xcode) and select the Resources Group. Control click on it and select Add -> New File. Select Empty File in Project from the New File dialog and name the file: Localizable.strings
Open a Get Info (Cmd+I) window for the new file, and in the General tab, click the Make Localizable button.
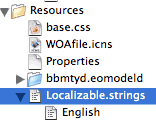
Your Resources group in Xcode will look like this:

In your project folder you will get a new folder called English.lproj:

To add additional languages to your project, open a Get Info window for the Localiable.strings group in Xcode and click on the Add Localization button. In the resulting sheet enter French.
The new localization properties text files we’ve just created will be used by the ERXLocalizer class, they should contain a series of Key-Value pairs structured like this:
{
    //Common
    "save" = "Save";
    "create_new_user" = "Subscribe as a New User";
    "cancel" = "Cancel";
}
Obvously you will need to create equally pithy entries in the French properties file as well.
To us the new localization properties, we need to replace all of our static text in our components with WOStrings. Then we can bind them to the appropriate key so they look something like this: "session.localizer.create_new_user".
To make my life easier I usually base all of my components on my own super component (perhaps CBComponent):
import com.webobjects.foundation.*;
import com.webobjects.appserver.*;
import com.webobjects.eocontrol.*;
import com.webobjects.eoaccess.*;
import er.extensions.*;

public class CBComponent extends WOComponent {

    public CBComponent(WOContext context) {
         super(context);
    }
    public Session sess() {
         return (Session)this.session();
    }
    public ERXLocalizer loc() {
         return sess().localizer();
    }
}
This is a good place to put convenience methods, and common functionality (perhaps a WOComponent backPage; variable). With the convenience methods above we can now bind our WOStrings to "loc.keyForTheText".
Once you have completed these steps you will have a fully localized project. The languages array of your app’s Session will be poplulated with the client language preferences from the first request of the user’s browser… if they have it configured correctly.
Since relying on a properly configured client web browser is a dangerous proposition, you will probably want to give the user a mechanism to manually select the language for the site. The following code will change the language array in the Session manually:
public WOComponent changeLanguage() {
     NSArray languageArray = new NSArray(new String[]
                                           {"French",
                                            "English"});
     session().setLanguages(languageArray);
     return null;
}
Bind it to the action binding of a WOHyperlink or WOSubmitButton and you’re all set.
There, now I won’t forget…