Someone asked where they could go to find a tutorial on using WebObjects DirectActions , I went looking and, horrors of horrors, found the Internet wanting! Really, I should write a letter. Sigh… why do I have to do everything around here?
There are two ways of invoking actions in a WebObjects application. Component Actions and Direct Actions (Actions are methods triggered by a request – ie: clicking a link triggers an action to return the next page, or clicking a button triggers an action to log a user in with form values). Component actions are used by default and are covered extensively by the Apple tutorials (binding to the action binding of a WO Dynamic Element – WOActiveImage, WOHyperlink, WOSubmitButton, etc – generates a component action). The resulting URLs are dynamic (based on the context id, session id, and component id) and cannot be bookmarked.
Component actions are well suited for many types of applications (wizards, order checkout, admin utilities, etc). But because they have a dynamic URL they may not be suitable if you need to allow visitors to bookmark their pages (a catalog or reference site for instance). As well, each visitor will receive a relatively heavyweight Session object, so they may not be appropriate if you expect a lot of visitors and/or you do not need to track their state. Direct Action are designed for these situtations.
Direct Actions (DAs) are a WebObjects mechanism for performing actions with a static URL. Direct Actions don’t automatically invoke a Session (if you don’t need one) so they can be lighter weight. However they require a little more effort to get to work, and because they are not inherently stateful, you need to think a little more to ensure that state is captured.
We’re going to look at a simple example of the steps needed to setup and trigger a DirectAction.
There are three steps to setting up and using a DirectAction:
- Configure the Application Request Handler
- Create the action in the DirectAction class
- Create a link or redirect to access the new directAction
1. Configuring the Application Request Handler
By default a new WebObjects application will have a component action request handler (identified by the /wo/ portion of the URL). This is a sample component action URL:
http://localhost/cgi-bin/WebObjects/
            this.woa/wo/E5gVcEa7GA0bT714xOYsUg/0.0.3.1
As an aside: The string E5gVcEa7GA0bT714xOYsUg is the Session ID and identifies the current user session, you can remove it from the URL by storing it in a browser cookie instead if you wish (warning: this will break your app if the browser is configured refuses cookies – so check first):
// In your Session constructor
setStoresIDsInCookies(true);
setStoresIDsInURLs(false);
To use DirectActions we need to change the Application’s defaultRequestHandler to the directActionRequestHandler. This code in your Application constructor will do the job:
// In your Application constructor
String directActionRequestHandlerKey =
	this.directActionRequestHandlerKey();
WORequestHandler directActionRequestHandler =
	this.requestHandlerForKey(directActionRequestHandlerKey);
this.setDefaultRequestHandler(directActionRequestHandler);
2. Create the action in the DirectAction class
Your custom code can go in either your own java class, or in the default DirectAction.java created with each project. To keep things simple we will extend the DirectAction.java class.
If you take a look at the DirectAction.java class of a new project, you will see that it has one action: defaultAction that looks like this:
public WOActionResults defaultAction() {
	return pageWithName("Main");
}
This action is pretty straight forward. It follows the naming convention for DirectActions (namely: actionNameAction) and it returns the WOComponent with the name "Main". An application that has a directActionResponseHandler as it’s defaultResponseHandler will process any request that doesn’t specify an action (and/or class) by the defaultAction in the DirectAction class. You can see this for yourself by changing the defaultAction to this:
public WOActionResults defaultAction() {
	System.out.println("Using the default action");
	return pageWithName("Main");
}
If you build and run your application and you should see Using the default action in the console when the Main page loads.
That’s all very exciting, but what we really want to do is create our own custom action that gets triggered by a specific URL. So lets create our own action. In the DirectAction.java class add the following:
public WOActionResults helloWorldAction() {
	WOComponent page = pageWithName("Main");
	page.takeValueForKey("Hello World", "myDisplayString");
	return page;
}
To make this work we need to modify our Main WOComponent. Add a String called myDisplayString to Main.java (make sure to give it accessor methods) and in the Main.wo add a WOString component and bind its value to myDisplayString.
Build and run the application. It should open and empty browser window. Use this URL to trigger your new helloWorldAction:
http://localhost:55555/cgi-bin/WebObjects/Test.woa/wa/helloWorld
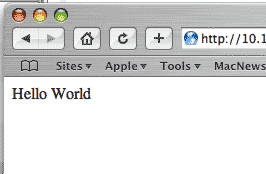
Replace the 55555 in the URL above with the actual port for your application instance – also notice that we’ve replaced the /wo/ with /wa/ indicating that this is a DirectAction URL. When the page reloads you should see this:

So, by using DirectActions we can easily call arbitrary methods by specifying them in our URL.
3. Create a link or redirect to access the new directAction
To access our DirectActions we could hard code the URL as an href in a link, or ask our users to manually enter them – like we just did, but neither of those are really practical. Thankfully many of the WO Dynamic Elements – such as the WOHyperlink we are about to use – have built in support for DirectActions.
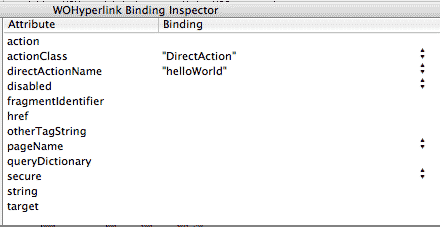
Add a WOHyperLink to your Main WOComponent and set its bindings so they look like this:

Build and run your application, when the Main page loads, it should have your new hyperlink. Clicking on it should reload the page with the helloWorld URL.
This little tutorial gives a basic overview of how DirectActions are used. But there is a lot more that we can do. Some of the things we will still need to tackle are:
- Passing parameters to our action
- Accessing a database with our action
- Invoking or using a Session with our action
I’ll try to get to some of that next time.
